05/16/18 Lesson Notes
Next lesson: (Date and time omitted for sample page), Putting - bring your putter
Great job today Student Name, I'm keeping the follow up simple. My expectation for your practice (omitted for sample page).
When you practice, think about:
(omitted for sample page)
When you play, distill your thoughts to:
(omitted for sample page)
Putting Lesson Preview Notes
Clubs For Lesson: putter
Here's a link to video of all the putting drills we will go through at your lesson:
(omitted for sample page)
On that page is a link to the mobile site page so that you can watch
the videos on your phone while practicing. Here's the exact address if
you want to put it in your phone: (omitted for sample page)
Please keep the website addresses for the drills confidential, they are
for students and for those that bought the SquareStrike™ training aid only.
Please review Pre-Shot Routines here:
http://www.tomtuckergolf.com/drillpreshot.html
We don't spend a lot of time on it at the lesson because it's something
you should be able to read and understand vs. technique methods
that we concentrate on at lessons that require coaching.
There is absolutely no reason that you can't be an excellent putter,
so believe that you can get there. That's the first step towards becoming one.
Great putters knew they were great putters before they actually became great putters.
OBJECTIVE: for the student to understand how to stroke a putt; for the student to see
and feel the squareness of the face to the ball, for the student to learn to develop their
"Stock" putting stroke in order to progress into developing feel for longer lag putts ,
for the student to develop a short putt stroke technique.
PUTTING GRIP - reverse overlap grip
SETUP - Practice setup positions in front of a mirror if possible.
- Weight - Forward
- Ball - Forward
- Hands - Forward, and forward pressed into a putting stroke impact fix position
prior to stroke execution. Be careful to not change the putterhead alignment.
- Forward arm aligned almost vertically with shaft, and a flat forward wrist.
BODY ALIGNMENT - Some of history's best putters set up slightly open to their aimline.
However - square, parallel left or even closed is also acceptable.
The alignment that allows you to comfortably stroke the putter down your aimline at impact
is the one you should use. We start with the square alignment.
AIMLINE - the direction pointing to where you want the putt to start out. All great
putters have one thing in common: they start their putt on their intended line.
"STOCK" Putting Stroke - the stroke that prepares your brain for putting distance
as it relates to your stroke length calculations for putting on a particular day on a
particular course. Think of your "stock" putting stroke as a calibration tool to help your
brain establish parameters for swing length in relation to putt distance.
As such, the length and power of the stroke needs to be absolutely consistent
every time it's made. The length of the backswing for your stock stroke should be
relatively short. The rollout from your stock stroke on average speed greens should
be anywhere from six to ten feet. Whatever the length, if you made ten "stock"
putting strokes with a ball on the same green, in the same direction, the balls
should rollout the same distance every time, give or take an inch. Your "stock" stroke
needs to be practiced until you master it that well.
PRE-PUTT ROUTINE
- Three or more practice strokes behind the ball, looking at the hole and visualizing the ball rolling into the cup
- Three or more practice strokes next to the ball, 8 inches to the side
- Step into the ball and stroke a good putt
STROKE MECHANICS no hands or wrists, also keep your head and lower body quiet (still)
through the stroke. Your shoulders move the stroke.
PUTT EXECUTION - 8 count stroke sequence (recite to yourself for each and every putt)
- Target (Stare)
- Target (Stare)
- Ball
- Target (Stare)
- Ball
- Ball
- Stroke - OPTIONAL - use "Straight Back Straight Through" mantra to develop rhythmic stroke
- Hold
READING BREAK - uphill putts, read from behind the ball; downhill putts read from behind the hole.
If this thought is simpler for you use it: read the green from the low side of the putt.
Favoring the low side positions your sight lines closer to perpendicular to the slope when you
crouch, so you look into the hill, not down it.
SquareStrike™ drills:
- Elevated Aimline Drill
- Squareness Awareness drill
- Aimline Accuracy drill
- Stock Stroke drill
- Barrier Drill
- Short Putt Channel Drill
PUTT SPEED - about 2 revolutions per second when the ball is dying at the
hole. This works out to about 8" to 10" past the hole when the ball stops.
FOR LAG PUTTING - speed is everything.
FOR MAKEABLE PUTTS - Putter face squareness to your aimline equals or
surpasses speed as the primary consideration. Your stroke should be
straight back and straight through for short putts, no exceptions. Stroke
your putt down a lane vs. a line for better visualization.
QUIET HEAD AND LOWER BODY Keep your head and lower body quiet (still)
through the stroke, it's all arms and shoulders NO HANDS OR WRISTS
If you have a choice between putting and chipping, putting is preferable because
your bad putts are ALWAYS better shots than your bad chips, and the ground
is much safer than the air.
BALL STRIKING LESSON - please bring your 8 iron and your pitching wedge
Lesson objective - to teach you how to practice and perform the
impact position correctly; to learn to compress the ball.
Ball Flight Laws - Direction and Curvature
Keep in mind that impact takes 1/2000th of a second.
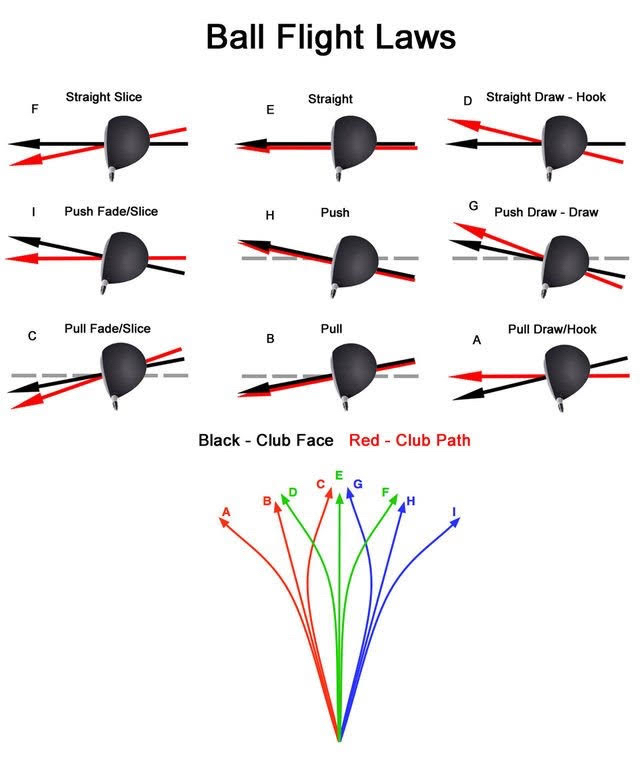
Here's the basic premise of ball flight laws: the clubface is responsible
for around 85% of the starting direction of your ball. The path puts
spin on the ball. The differential between clubface and swingpath determines
the direction of curvature (draw or fade).
The short but sweet explanation is this: the ball will always (85%) start where
the face is aiming, and it will curve away from your clubhead swingpath at impact.
A cut or fade shot requires a swingpath that's leftward of your target line with a face that's aiming right of it.
A draw or hook shot requires a swingpath that's rightward of your target line with a face that's aiming left of it.
All of this will be easier to understand after your lesson,
the objective of this explanation is to get your thinking started in the right direction:
- we swing on an angled circle (swing plane)
- the bottom (center) of your swing is located approximately in line with
your left shoulder socket (right shoulder socket for lefties). This also is
the point of tangency of the downswing circle with the ball - target line.
- any ball struck behind the bottom (center) of the circle is struck with a
downward strike angle and outward horizontal swingpath (down and to the right)
- any ball struck at the bottom (center) of the circle is struck with a flat
strike angle and straight horizontal swingpath (flat and straight)
- any ball struck at the front side of the bottom (center) of the circle is struck
with an upward strike angle and an inward horizontal swingpath (up and to the left)
- the ball curves due friction created by the differential between the angle of
the clubface in relation to the horizontal angle of the swing path. (angle of the face
in relation to a projection of the swingpath line at impact)
Impact - Impact Fix Position

- Pressure on the forward foot, hands forward (forward shaft lean).
- Left wrist straight or bent.
- Right wrist cupped.
- Left arm connected.
- 85 degree rear leg angle at setup and on backswing.
Note that pressure is exerted downward on the forward foot vs. leaning
or tipping towards the target which we do not want to do.
Inverted Praying Hands Drill
Educating The Hands - Clubface Control
How the wrists work through impact.
- Roll Release: (also known as a horizontal hinging action) easy speed increase, can be inconsistent
re: directional control if swing path is not disciplined, produces low trajectory, medium risk release
- Square Release: (also known as an angled hinging action) fights rotation, maximum directional control,
produces a normal trajectory, low risk release
- Vertical Release: (also known as a vertical hinging action) most "lie dependent" hinging motion, produces
the highest trajectory and softest landing, works well with finesse swing, highest risk release
- Flipping: the wrong way to release
Line Drill in Sand, Followed by Short Swing Drill
Drill done to train a swing to bottom out about 1' to 4" in front of
the ball (line)
- Execute short swings, then medium length loaded swings. keeping the
pressure on your forward leg. Take shallow divots ahead of the line - never
behind the line.
- Practice until you can do ten half swings in a row, with no divots starting
behind the line.
- Key thought: squishing the ball into the ground vs. sweeping it
|